What are DIY Teeth Whitening Strips
DIY teeth whitening strips represent a cost-effective and accessible method for enhancing the brightness of your smile from the convenience of your home. They typically involve a combination of common household ingredients, with baking soda often taking center stage due to its mild abrasive properties and ability to remove surface stains. The appeal of these homemade strips lies in their simplicity and the ability to customize the ingredients to suit individual preferences and sensitivities. Unlike professional teeth whitening treatments or commercially available strips, DIY options offer a more natural approach, avoiding potentially harsh chemicals. This guide will walk you through the process of creating and using these strips, helping you understand the science behind them, the ingredients needed, and the best practices to achieve noticeable results. Furthermore, it will also discuss the advantages and disadvantages, ensuring you have all the information needed to make an informed decision about incorporating this method into your oral hygiene routine.
The Science Behind Baking Soda for Teeth Whitening
The effectiveness of baking soda in teeth whitening is largely due to its unique properties. Baking soda, also known as sodium bicarbonate, acts as a gentle abrasive, helping to scrub away surface stains caused by coffee, tea, wine, and other foods. Its slightly alkaline nature also helps neutralize acids in the mouth, which can contribute to enamel erosion and discoloration. While it’s not a bleaching agent like hydrogen peroxide, baking soda can effectively remove these stains, revealing the natural whiteness of your teeth. However, it is crucial to understand that baking soda’s action is limited to the surface of the teeth. Deep-seated stains or significant discoloration may not be as effectively addressed with this method. The level of whitening achieved depends on factors like the severity of the stains and the consistency of use. To maximize its benefits and minimize potential risks, correct usage and adherence to recommended application guidelines are essential.
How to Make DIY Baking Soda Strips

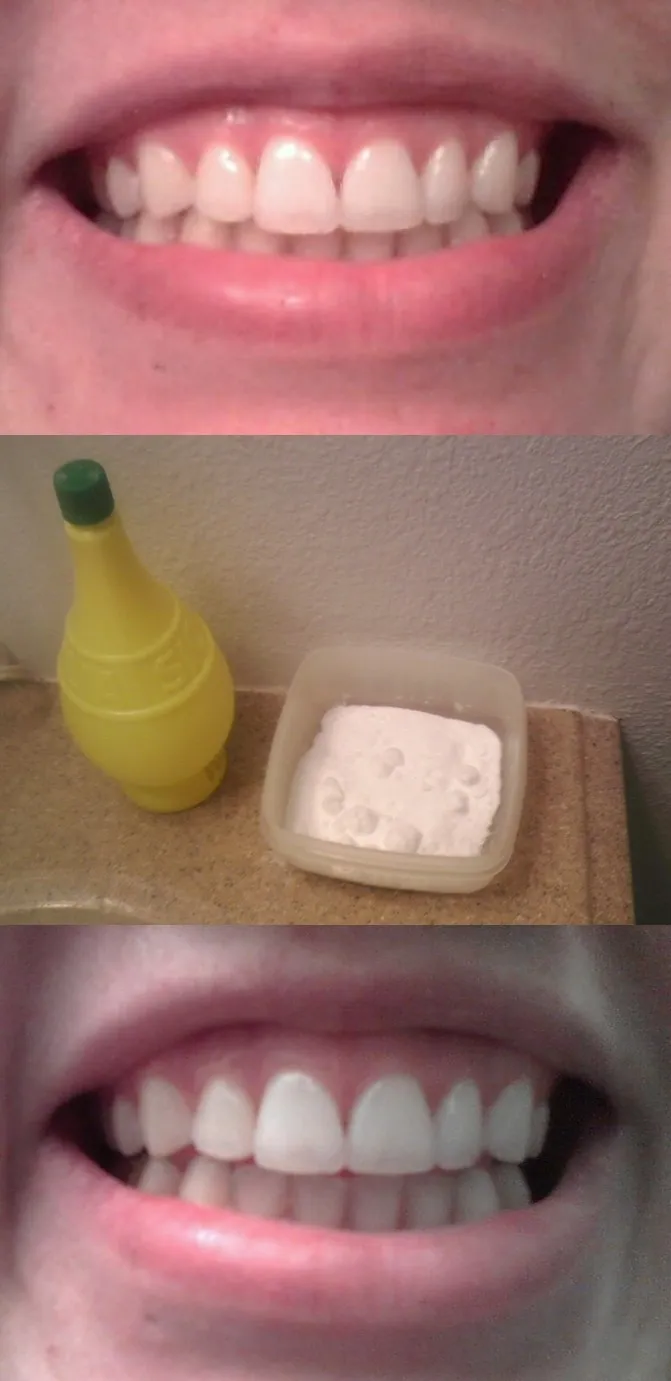
Gathering Your Ingredients
To create your own teeth whitening strips, you’ll need a few simple, readily available ingredients. The star ingredient is, of course, baking soda. Ensure you use pure baking soda, not baking powder, as they have different compositions and effects. You’ll also need water, ideally distilled or filtered, to mix with the baking soda and form a paste. In some variations, you might include a small amount of lemon juice or hydrogen peroxide for added whitening power, but it’s crucial to use these sparingly and with caution due to their acidity. Additionally, you’ll require a small bowl or container for mixing and a clean toothbrush or a soft-bristled brush for application. Finally, you may choose to use a piece of plastic wrap or a small, clean container to hold the strip shape during application, which will help to maintain the form and maximize contact with your teeth.
Mixing and Applying the Baking Soda Paste
The mixing process is straightforward: combine the baking soda and water in a small bowl. Start with a small amount of water, adding it gradually until you achieve a thick, paste-like consistency. The goal is to create a mixture that is easy to apply but doesn’t drip or run. If you’re adding lemon juice or hydrogen peroxide, incorporate a few drops at a time, ensuring they are thoroughly mixed into the paste. Once the paste is ready, use a clean toothbrush or a soft-bristled brush to apply a thin, even layer to your teeth. Ensure that all surfaces of your teeth are covered, paying particular attention to areas with visible stains. Avoid applying the paste to your gums to prevent any potential irritation. If using plastic wrap to make the strip, apply the paste evenly on the plastic wrap shape, cut as required.
Using the Strips and Timing

After applying the paste, it’s essential to follow the correct application method and timing to maximize the whitening effect and minimize potential risks. Once the paste is evenly spread across your teeth, gently place the strip on your teeth, ensuring good contact with the surfaces. If you are not using a strip, leave the paste on your teeth for a specified period. Typically, this ranges from 1 to 3 minutes, depending on your tooth sensitivity and the concentration of additional ingredients. Exceeding this time can increase the risk of enamel erosion or gum irritation. During this period, avoid swallowing the paste, as it is not meant for ingestion. After the designated time, thoroughly rinse your mouth with water, ensuring all traces of the paste are removed. Then, gently brush your teeth to remove any remaining residue.
After Application What to Expect
After using DIY baking soda teeth whitening strips, you might notice some immediate changes and a gradual improvement over time. Initially, your teeth may feel smoother due to the abrasive action of the baking soda removing surface stains and plaque. The extent of whitening can vary depending on several factors, including the severity of existing stains, the frequency of use, and your natural tooth color. Some individuals may see a noticeable difference after just a few applications, while others might require more consistent use over several weeks. It’s also important to be aware that individual results can vary. While some may experience significant whitening, others might notice only a subtle change. Additionally, some people may experience temporary tooth sensitivity or gum irritation, which usually subsides shortly after the treatment.
DIY Baking Soda Strips Effectiveness
The effectiveness of DIY baking soda strips largely depends on the type and severity of the stains present on your teeth. Baking soda is most effective against surface stains, such as those caused by coffee, tea, and smoking. It acts by gently scrubbing away these external discolorations, revealing the underlying natural whiteness of your teeth. However, it is not as effective on deeper stains or intrinsic discoloration, which may require professional treatments like bleaching. For optimal results, regular and consistent use is recommended. However, it’s essential to balance the frequency of use with the potential risks of enamel erosion. Combining baking soda strips with good oral hygiene practices, such as regular brushing and flossing, can help to enhance and maintain the whitening effects. This approach ensures that surface stains are continuously removed, preventing them from accumulating and diminishing the brightness of your smile.
Pros and Cons of Baking Soda Strips

Benefits of DIY Strips
One of the main advantages of DIY baking soda strips is their cost-effectiveness. The ingredients are typically inexpensive and readily available, making this method a budget-friendly alternative to professional treatments or commercial whitening products. DIY strips are also easily accessible, allowing you to whiten your teeth from the comfort of your home without the need for appointments or special equipment. This accessibility is especially convenient for those with busy schedules or limited access to dental clinics. DIY strips also allow for customization. You can control the concentration of ingredients, tailoring the treatment to your specific needs and sensitivity levels. Furthermore, this approach encourages a more natural approach to teeth whitening, avoiding the harsh chemicals found in some commercial products. This can be a significant advantage for individuals seeking a gentler, more eco-friendly option.
Potential Drawbacks
Despite the advantages, DIY baking soda strips have potential drawbacks that should be carefully considered. The abrasive nature of baking soda can cause enamel erosion if used too frequently or with excessive force, which can increase tooth sensitivity and vulnerability to decay. The effectiveness of this method is limited to surface stains; it might not address deeper or intrinsic discoloration effectively. There’s also a risk of gum irritation if the paste comes into contact with the gums for an extended period, leading to discomfort or inflammation. The lack of professional guidance is another potential concern; without expert advice, you may not be aware of any underlying dental issues that could be exacerbated by this method. Furthermore, the results can be inconsistent, and the degree of whitening achieved may not meet the expectations of all users. Therefore, it’s important to use this method with caution, follow recommended guidelines, and be mindful of your oral health.
Tips for Best Results with Baking Soda Strips

To get the best results from DIY baking soda strips, it is crucial to follow several important tips. First, start by brushing your teeth thoroughly before applying the paste to remove any food particles or debris that could interfere with the whitening process. Be patient and consistent. Regular use, as directed, is key to achieving visible results. Avoid overusing the strips, as frequent application can increase the risk of enamel erosion. Monitor your teeth and gums for any signs of sensitivity or irritation. If you experience these issues, reduce the frequency of use or discontinue the treatment. Always use a soft-bristled toothbrush and apply gentle pressure to avoid abrasion. After using the strips, rinse your mouth thoroughly with water to ensure all traces of the paste are removed. Consult your dentist. They can provide personalized advice based on your oral health needs. Finally, combine the use of DIY strips with a comprehensive oral hygiene routine, including regular brushing, flossing, and dental check-ups.
Maintaining a Bright Smile After Whitening
Maintaining a bright smile after using DIY baking soda strips involves several key strategies. Firstly, practice excellent oral hygiene. Brush your teeth at least twice a day for two minutes each time, using fluoride toothpaste to strengthen your enamel. Floss daily to remove plaque and food particles from between your teeth, areas where brushing can’t reach. Schedule regular dental check-ups and cleanings with your dentist. They can help to remove any lingering stains and provide professional advice on maintaining your oral health. Limit your intake of stain-causing foods and drinks. Reduce or avoid coffee, tea, red wine, and dark-colored foods. If you consume these, rinse your mouth with water immediately afterward to minimize their impact. Use a whitening toothpaste or mouthwash. These products can help to remove surface stains and maintain the brightness of your teeth. Consider using a straw for beverages that stain teeth, to minimize contact. Avoid smoking and other tobacco products, as they are major contributors to tooth discoloration. Finally, consider touch-up treatments. You can repeat the DIY baking soda strip treatment or other whitening methods as needed, but always with moderation and caution.